https://www.w3schools.com/cpp/
CPP tutorial


C++ Tutorial

C++ is a programming language.

C++ is used to create computer programs.


Examples in Each Chapter

Our "Show C++" tool makes it easy to learn C++, it shows both the code and the result.

Example

#include <iostream>
using namespace std;

int main() {
  cout << "Hello World!";
  return 0;
}
Run example »

Click on the "Run example" button to see how it works.

We recommend reading this tutorial, in the sequence listed in the left menu.

C++ is an object oriented language and some concepts may be new. Take breaks when needed, and go over the examples as many times as needed.


C++ Exercises

Test Yourself With Exercises

Exercise:

Insert the missing part of the code below to output "Hello World".

int main() {
   << "Hello World!";
  return 0;
}

Start the Exercise


Learn by Examples

Learn by examples! This tutorial supplements all explanations with clarifying examples.

See All C++ Examples


C++ Introduction


What is C++?

C++ is a cross-platformed language that can be used to create sophisticated high-performance applications.

C++ was developed by Bjarne Stroustrup at Bell labs in 1979, as an extension to the C language.

C++ gives programmers a high level of control over system resources and memory.

The language was updated 3 major times in 2011, 2014, and 2017 to C++11, C++14, and C++17.


Why Use C++

C++ is one of the world's most popular programming languages.

C++ can be found in today's operating systems, Graphical User Interfaces, and embedded systems.

C++ is an object oriented language which gives a clear structure to programs and allows code to be reused, lowering development costs.

C++ is portable and can be used to develop applications that can be adapted to multiple platforms.

C++ is fun and easy to learn!


Get Started

This tutorial will teach you the basics of C++.

It is not necessary to have any prior programming experience.

Get Started »

C++ Getting Started


C++ Get Started

To start using C++, you need two things:

There are many text editors and compilers to choose from. In this tutorial, we will use an IDE (see below).


C++ Install IDE

An IDE (Integrated Development Environment) is used to edit AND compile the code.

Popular IDE's include Code::Blocks, Eclipse, and Visual Studio. These are all free, and they can be used to both edit and debug C++ code.

Note: Web-based IDE's can work as well, but functionality is limited.

We will use Code::Blocks in our tutorial, which we believe is a good place to start.

You can find the latest version of Codeblocks at http://www.codeblocks.org/downloads/26. Download the mingw-setup.exe file, which will install the text editor with a compiler.


C++ Quickstart

Let's create our first C++ file.

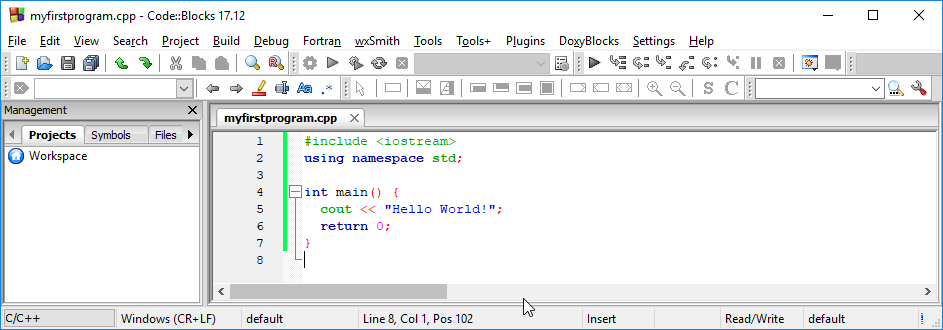
Open Codeblocks and go to File > New > Empty File.

Write the following C++ code and save the file as myfirstprogram.cpp (File > Save File as):

myfirstprogram.cpp

#include <iostream>
using namespace std;

int main() {
  cout << "Hello World!";
  return 0;
}

Don't worry if you don't understand the code above - we will discuss it in detail in later chapters. For now, focus on how to run the code.

In Codeblocks, it should look like this:

Then, go to Build > Build and Run to run (execute) the program. The result will look something to this:

Hello World!
Process returned 0 (0x0) execution time : 0.011 s
Press any key to continue.

Congratulations! You have now written and executed your first C++ program.


Learning C++ At W3Schools

When learning C++ at W3Schools.com, you can use our "Run Example" tool, which shows both the code and the result. This will make it easier for you to understand every part as we move forward:

myfirstprogram.cpp

Code:

#include <iostream>
using namespace std;

int main() {
  cout << "Hello World!";
  return 0;
}

Result:

Hello World!
Run example »

C++ Syntax


C++ Syntax

Let's break up the following code to understand it better:

Example

#include <iostream>
using namespace std;

int main() {
  cout << "Hello World!";
  return 0;
}
Run example »

Example explained

Line 1: #include <iostream> is a header file library that lets us work with input and output objects, such as cout (used in line 5). Header files add functionality to C++ programs.

Line 2: using namespace std means that we can use names for objects and variables from the standard library.

Don't worry if you don't understand how #include <iostream> and using namespace std works. Just think of it as something that (almost) always appears in your program.

Line 3: A blank line. C++ ignores white space.

Line 4: Another thing that always appear in a C++ program, is int main(). This is called a function. Any code inside its curly brackets {} will be executed.

Line 5: cout (pronounced "see-out") is an object used to output/print text. In our example it will output "Hello World".

Note: Every C++ statement ends with a semicolon ;.

Note: The body of int main() could also been written as:
int main () { cout << "Hello World! "; return 0; }

Remember: The compiler ignores white spaces. However, multiple lines makes the code more readable.

Line 6: return 0 ends the main function.


Omitting Namespace

You might see some C++ programs that runs without the standard namespace library. The using namespace std line can be omitted and replaced with the std keyword, followed by the :: operator for some objects:

Example

#include <iostream>

int main() {
  std::cout << "Hello World!";
  return 0;
}
Run example »

It is up to you if you want to include the standard namespace library or not.


C++ Output (Print Text)


C++ Output (Print Text)

The cout object, together with the << operator, is used to output values/print text:

Example

#include <iostream>
using namespace std;

int main() {
  cout << "Hello World!";
  return 0;
}
Run example »

You can add as many cout objects as you want. However, note that it does not insert a new line at the end of the output:

Example

#include <iostream>
using namespace std;

int main() {
  cout << "Hello World!";
  cout << "I am learning C++";
  return 0;
}
Run example »

New Lines

To insert a new line, you can use the \n character:

Example

#include <iostream>
using namespace std;

int main() {
  cout << "Hello World! \n";
  cout << "I am learning C++";
  return 0;
}
Run example »

Tip: Two \n characters after each other will create a blank line:

Example

#include <iostream>
using namespace std;

int main() {
  cout << "Hello World! \n\n";
  cout << "I am learning C++";
  return 0;
}
Run example »

Another way to insert a new line, is with the endl manipulator:

Example

#include <iostream>
using namespace std;

int main() {
  cout << "Hello World!" << endl;
  cout << "I am learning C++";
  return 0;
}
Run example »

Both \n and endl are used to break lines. However, \n is used more often and is the preferred way.


C++ Comments


C++ Comments

Comments can be used to explain C++ code, and to make it more readable. It can also be used to prevent execution when testing alternative code. Comments can be singled-lined or multi-lined.

Single-line comments start with two forward slashes (//).

Any text between // and the end of the line is ignored by the compiler (will not be executed).

This example uses a single-line comment before a line of code:

Example

// This is a comment
cout << "Hello World!";
Run example »

This example uses a single-line comment at the end of a line of code:

Example

cout << "Hello World!"; // This is a comment
Run example »

C++ Multi-line Comments

Multi-line comments start with /* and ends with */.

Any text between /* and */ will be ignored by the compiler:

Example

/* The code below will print the words Hello World!
to the screen, and it is amazing */
cout << "Hello World!";
Run example »

C++ Variables


C++ Variables

Variables are containers for storing data values.

In C++, there are different types of variables (defined with different keywords), for example:


Declaring (Creating) Variables

To create a variable, you must specify the type and assign it a value:

Syntax

type variable = value;

Where type is one of C++ types (such as int), and variable is the name of the variable (such as x or myName). The equal sign is used to assign values to the variable.

To create a variable that should store a number, look at the following example:

Example

Create a variable called myNum of type int and assign it the value 15:

int myNum = 15;
cout << myNum;
Run example »

You can also declare a variable without assigning the value, and assign the value later:

Example

int myNum;
myNum = 15;
cout << myNum;
Run example »

Note that if you assign a new value to an existing variable, it will overwrite the previous value:

Example

int myNum = 15;  // myNum is 15
myNum = 10;  // Now myNum is 10
cout << myNum;  // Outputs 10
Run example »

However, you can add the const keyword if you don't want others (or yourself) to override existing values (this will declare the variable as "constant", which means unchangeable and read-only):

Example

const int myNum = 15;  // myNum will always be 15
myNum = 10;  // error: assignment of read-only variable 'myNum'
Run example »

Other Types

A demonstration of other data types:

Example

int myNum = 5;               // Integer (whole number without decimals)
double myFloatNum = 5.99;    // Floating point number (with decimals)
char myLetter = 'D';         // Character
string myText = "Hello";     // String (text)
bool myBoolean = true;       // Boolean (true or false)

You will learn more about the individual types in the Data Types chapter.


Display Variables

The cout object is used together with the << operator to display variables.

To combine both text and a variable, separate them with the << operator:

Example

int myAge = 35;
cout << "I am " << myAge << " years old.";
Run example »

Add Variables Together

To add a variable to another variable, you can use the + operator:

Example

int x = 5;
int y = 6;
int sum = x + y;
cout << sum;
Run example »

Declare Many Variables

To declare more than one variable of the same type, you can use a comma-separated list:

Example

int x = 5, y = 6, z = 50;
cout << x + y + z;
Run example »

C++ Identifiers

All C++ variables must be identified with unique names.

These unique names are called identifiers.

Identifiers can be short names (like x and y) or more descriptive names (age, sum, totalVolume).

The general rules for constructing names for variables (unique identifiers) are:


C++ User Input


C++ User Input

You have already learned that cout is used to output (print) values. Now we will use cin to get user input.

cin is a predefined variable that reads data from the keyboard with the extraction operator (>>).

In the following example, the user can input a number, which is stored in the variable x. Then we print the value of x:

Example

int x; 
cout << "Type a number: "; // Type a number and press enter
cin >> x; // Get user input from the keyboard
cout << "Your number is: " << x; // Display the input value
Run example »

Good To Know

cout is pronounced "see-out". Used for output, and uses the insertion operator (<<)

cin is pronounced "see-in". Used for input, and uses the extraction operator (>>)

In this example, the user needs to input two numbers, and then we print the sum:

Example

int x, y;
int sum;
cout << "Type a number: ";
cin >> x;
cout << "Type another number: ";
cin >> y;
sum = x + y;
cout << "Sum is: " << sum;
Run example »

C++ Data Types


C++ Data Types

As explained in the Variables chapter, a variable in C++ must be a specified data type:

Example

int myNum = 5;               // Integer (whole number)
float myFloatNum = 5.99;     // Floating point number
double myDoubleNum = 9.98;   // Floating point number
char myLetter = 'D';         // Character
bool myBoolean = true;       // Boolean
string myText = "Hello";     // String
Run example »

Basic Data Types

The data type specifies the size and type of information the variable will store:

Data Type Size Description
int 4 bytes Stores whole numbers, without decimals
float 4 bytes Stores fractional numbers, containing one or more decimals. Sufficient for storing 7 decimal digits
double 8 bytes Stores fractional numbers, containing one or more decimals. Sufficient for storing 15 decimal digits
boolean 1 byte Stores true or false values
char 1 byte Stores a single character/letter/number, or ASCII values

Use int when you need to store a whole number without decimals, like 35 or 1000, and float or double when you need a floating point number (with decimals), like 9.99 or 3.14515.

int

int myNum = 1000;
cout << myNum;
Run example »

float

float myNum = 5.75;
cout << myNum;
Run example »

double

double myNum = 19.99;
cout << myNum;
Run example »

float vs. double

The precision of a floating point value indicates how many digits the value can have after the decimal point. The precision of float is only six or seven decimal digits, while double variables have a precision of about 15 digits. Therefore it is safer to use double for most calculations.

Scientific Numbers

A floating point number can also be a scientific number with an "e" to indicate the power of 10:

Example

float f1 = 35e3;
double d1 = 12E4;
cout << f1;
cout << d1;
Run example »

Booleans

A boolean data type is declared with the bool keyword and can only take the values true or false. When the value is returned, true = 1 and false = 0.

Example

bool isCodingFun = true;
bool isFishTasty = false;
cout << isCodingFun;  // Outputs 1 (true)
cout << isFishTasty;  // Outputs 0 (false)
Run example »

Boolean values are mostly used for conditional testing, which you will learn more about in a later chapter.


Characters

The char data type is used to store a single character. The character must be surrounded by single quotes, like 'A' or 'c':

Example

char myGrade = 'B';
cout << myGrade;
Run example »

Alternatively, you can use ASCII values to display certain characters:

Example

char a = 65, b = 66, c = 67;
cout << a;
cout << b;
cout << c;
Run example »

Tip: A list of all ASCII values can be found in our ASCII Table Reference.


Strings

The string type is used to store a sequence of characters (text). This is not a built-in type, but it behaves like one in its most basic usage. String values must be surrounded by double quotes:

Example

string greeting = "Hello";
cout << greeting;

To use strings, you must include an additional header file in the source code, the <string> library:

Example

// Include the string library
#include <string>

// Create a string variable
string greeting = "Hello";

// Output string value
cout << greeting;
Run example »

You will learn more about strings, in our C++ Strings Chapter.


C++ Operators


C++ Operators

Operators are used to perform operations on variables and values.

The value is called an operand, while the operation (to be performed between the two operands) is defined by an operator:

Operand Operator Operand
100 + 50

In the example below, the numbers 100 and 50 are operands, and the + sign is an operator:

Example

int x = 100 + 50;
Run example »

Although the + operator is often used to add together two values, like in the example above, it can also be used to add together a variable and a value, or a variable and another variable:

Example

int sum1 = 100 + 50;        // 150 (100 + 50)
int sum2 = sum1 + 250;      // 400 (150 + 250)
int sum3 = sum2 + sum2;     // 800 (400 + 400)
Run example »

C++ divides the operators into the following groups:


Arithmetic Operators

Arithmetic operators are used to perform common mathematical operations.

Operator Name Description Example Try it
+ Addition Adds together two values x + y Try it »
- Subtraction Subtracts one value from another x - y Try it »
* Multiplication Multiplies two values x * y Try it »
/ Division Divides one value from another x / y Try it »
% Modulus Returns the division remainder x % y Try it »
++ Increment Increases the value of a variable by 1 ++x Try it »
-- Decrement Decreases the value of a variable by 1 --x Try it »


C++ Assignment Operators

Assignment operators are used to assign values to variables.

In the example below, we use the assignment operator (=) to assign the value 10 to a variable called x:

Example

int x = 10;
Try it Yourself »

The addition assignment operator (+=) adds a value to a variable:

Example

int x = 10;
x += 5;
Try it Yourself »

A list of all assignment operators:

Operator Example Same As
= x = 5 x = 5
+= x += 3 x = x + 3
-= x -= 3 x = x - 3
*= x *= 3 x = x * 3
/= x /= 3 x = x / 3
%= x %= 3 x = x % 3
&= x &= 3 x = x & 3
|= x |= 3 x = x | 3
^= x ^= 3 x = x ^ 3
>>= x >>= 3 x = x >> 3
<<= x <<= 3 x = x << 3

C++ Comparison Operators

Comparison operators are used to compare two values:

Operator Name Example
== Equal to x == y
!= Not equal x != y
> Greater than x > y
< Less than x < y
>= Greater than or equal to x >= y
<= Less than or equal to x <= y

C++ Logical Operators

Logical operators are used to determine the logic between variables or values:

Operator Name Description Example
&&  Logical and Returns true if both statements are true x < 5 &&  x < 10
||  Logical or Returns true if one of the statements is true x < 5 || x < 4
! Logical not Reverse the result, returns false if the result is true !(x < 5 && x < 10)

C++ Strings


C++ Strings

Strings are used for storing text.

A string variable contains a collection of characters surrounded by double quotes:

Example

Create a variable of type string and assign it a value:

string greeting = "Hello";

To use strings, you must include an additional header file in the source code, the <string> library:

Example

// Include the string library
#include <string>

// Create a string variable
string greeting = "Hello";
Run example »

String Concatenation

The + operator can be used between strings to add them together to make a new string. This is called concatenation:

Example

string firstName = "John ";
string lastName = "Doe";
string fullName = firstName + lastName;
cout << fullName;
Run example »

Note that we added a space after firstName to create a space between John and Doe on output.


String Length

A string in C++ is actually an object, which contain functions that can perform certain operations on strings. For example, the length of a string can be found with the length() function:

Example

string txt = "ABCDEFGHIJKLMNOPQRSTUVWXYZ";
cout << "The length of the txt string is: " << txt.length();
Run example »

Access Strings

You can access the characters in a string by referring to its index number inside square brackets [].

This example prints the first character in myString:

Example

string myString = "Hello";
cout << myString[0];
// Outputs H
Run example »

Note: String indexes start with 0: [0] is the first character. [1] is the second character, etc.

This example prints the second character in myString:

Example

string myString = "Hello";
cout << myString[1];
// Outputs e
Run example »

Change String Characters

To change the value of a specific character in a string, refer to the index number, and use single quotes:

Example

string myString = "Hello";
myString[0] = 'J';
cout << myString;
// Outputs Jello instead of Hello
Run example »

User Input Strings

It is possible to use the extraction operator >> on cin to display a string entered by a user:

Example

string firstName;
cout << "Type your first name: ";
cin >> firstName; // get user input from the keyboard
cout << "Your name is: " << firstName;

// Type your first name: John
// Your name is: John

However, cin considers a space (whitespace, tabs, etc) as a terminating character, which means that it can only display a single word (even if you type many words):

Example

string fullName;
cout << "Type your full name: ";
cin >> fullName;
cout << "Your name is: " << fullName;

// Type your full name: John Doe
// Your name is: John

From the example above, you would expect the program to print "John Doe", but it only prints "John".

That's why, when working with strings, we often use the getline() function to read a line of text. It takes cin as the first parameter, and the string variable as second:

Example

string fullName;
cout << "Type your full name: ";
getline (cin, fullName);
cout << "Your name is: " << fullName;

// Type your full name: John Doe
// Your name is: John Doe
Run example »

Adding Numbers and Strings

WARNING!

C++ uses the + operator for both addition and concatenation.

Numbers are added. Strings are concatenated.

If you add two numbers, the result will be a number:

Example

int x = 10;
int y = 20;
int z = x + y;      // z will be 30 (an integer)
Run example »

If you add two strings, the result will be a string concatenation:

Example

string x = "10";
string y = "20";
string z = x + y;   // z will be 1020 (a string)
Run example »

If you try to add a number to a string, an error occurs:

Example

string x = "10";
int y = 20;
string z = x + y;

Omitting Namespace

You might see some C++ programs that runs without the standard namespace library. The using namespace std line can be omitted and replaced with the std keyword, followed by the :: operator for string (and cout) objects:

Example

#include <iostream>
#include <string>

int main() {
  std::string greeting = "Hello";
  std::cout << greeting;
  return 0;
}
Run example »

It is up to you if you want to include the standard namespace library or not.


C++ Math


C++ Math

C++ has many functions that allows you to perform mathematical tasks on numbers.


Max and min

The max(x,y) function can be used to find the highest value of x and y:

Example

cout << max(5, 10);
Run example »

And the min(x,y) function can be used to find the lowest value of x and y:

Example

cout << min(5, 10);
Run example »

C++ <cmath> Header

Other functions, such as sqrt (square root), round (rounds a number) and log (natural logarithm), can be found in the <cmath> header file:

Example

// Include the cmath library
#include <cmath>

cout << sqrt(64);
cout << round(2.6);
cout << log(2);
Run example »

Other Math Functions

A list of other popular Math functions (from the <cmath> library) can be found in the table below:

Function Description
abs(x) Returns the absolute value of x
acos(x) Returns the arccosine of x, in radians
asin(x) Returns the arcsine of x, in radians
atan(x) Returns the arctangent of x, in radians
cbrt(x) Returns the cube root of x
ceil(x) Returns the value of x rounded up to its nearest integer
cos(x) Returns the cosine of x, in radians
cosh(x) Returns the hyperbolic cosine of x, in radians
exp(x) Returns the value of Ex
expm1(x) Returns ex -1
fabs(x) Returns the absolute value of a floating x
fdim(x, y) Returns the positive difference between x and y
floor(x) Returns the value of x rounded down to its nearest integer
hypot(x, y) Returns sqrt(x2 +y2) without intermediate overflow or underflow
fma(x, y, z) Returns x*y+z without losing precision
fmax(x, y) Returns the highest value of a floating x and y
fmin(x, y) Returns the lowest value of a floating x and y
fmod(x, y) Returns the floating point remainder of x/y
pow(x, y) Returns the value of x to the power of y
sin(x) Returns the sine of x (x is in radians)
sinh(x) Returns the hyperbolic sine of a double value
tan(x) Returns the tangent of an angle
tanh(x) Returns the hyperbolic tangent of a double value

C++ Booleans


C++ Booleans

Very often, in programming, you will need a data type that can only have one of two values, like:

For this, C++ has a bool data type, which can take the values true (1) or false (0).


Boolean Values

A boolean variable is declared with the bool keyword and can only take the values true or false:

Example

bool isCodingFun = true;
bool isFishTasty = false;
cout << isCodingFun;  // Outputs 1 (true)
cout << isFishTasty;  // Outputs 0 (false)
Run example »

From the example above, you can read that a true value returns 1, and false returns 0.

However, it is more common to return boolean values from boolean expressions (see below).


Boolean Expression

A Boolean expression is a C++ expression that returns a boolean value: 1 (true) or 0 (false).

You can use a comparison operator, such as the greater than (>) operator to find out if an expression (or a variable) is true:

Example

int x = 10;
int y = 9;
cout << (x > y); // returns 1 (true), because 10 is higher than 9
Run example »

Or even easier:

Example

cout << (10 > 9); // returns 1 (true), because 10 is higher than 9
Run example »

In the examples below, we use the equal to (==) operator to evaluate an expression:

Example

int x = 10;
cout << (x == 10);  // returns 1 (true), because the value of x is equal to 10
Run example »

Example

cout << (10 == 15);  // returns 0 (false), because 10 is not equal to 15
Run example »

Booleans are the basis for all C++ comparisons and conditions.

You will learn more about conditions (if...else) in the next chapter.


C++ If ... Else


C++ Conditions and If Statements

C++ supports the usual logical conditions from mathematics:

You can use these conditions to perform different actions for different decisions.

C++ has the following conditional statements:


The if Statement

Use the if statement to specify a block of C++ code to be executed if a condition is true.

Syntax

if (condition) {
  // block of code to be executed if the condition is true
}

Note that if is in lowercase letters. Uppercase letters (If or IF) will generate an error.

In the example below, we test two values to find out if 20 is greater than 18. If the condition is true, print some text:

Example

if (20 > 18) {
  cout << "20 is greater than 18";
}
Run example »

We can also test variables:

Example

int x = 20;
int y = 18;
if (x > y) {
  cout << "x is greater than y";
}
Run example »

Example explained

In the example above we use two variables, x and y, to test whether x is greater than y (using the > operator). As x is 20, and y is 18, and we know that 20 is greater than 18, we print to the screen that "x is greater than y".


The else Statement

Use the else statement to specify a block of code to be executed if the condition is false.

Syntax

if (condition) {
  // block of code to be executed if the condition is true
} else {
  // block of code to be executed if the condition is false
}

Example

int time = 20;
if (time < 18) {
  cout << "Good day.";
} else {
  cout << "Good evening.";
}
// Outputs "Good evening."
Run example »

Example explained

In the example above, time (20) is greater than 18, so the condition is false. Because of this, we move on to the else condition and print to the screen "Good evening". If the time was less than 18, the program would print "Good day".


The else if Statement

Use the else if statement to specify a new condition if the first condition is false.

Syntax

if (condition1) {
  // block of code to be executed if condition1 is true
} else if (condition2) {
  // block of code to be executed if the condition1 is false and condition2 is true
} else {
  // block of code to be executed if the condition1 is false and condition2 is false
}

Example

int time = 22;
if (time < 10) {
  cout << "Good morning.";
} else if (time < 20) {
  cout << "Good day.";
} else {
  cout << "Good evening.";
}
// Outputs "Good evening."
Run example »

Example explained

In the example above, time (22) is greater than 10, so the first condition is false. The next condition, in the else if statement, is also false, so we move on to the else condition since condition1 and condition2 is both false - and print to the screen "Good evening".

However, if the time was 14, our program would print "Good day."


Short Hand If...Else (Ternary Operator)

If you have only one statement to execute, one for if, and one for else, you can put it all on the same line:

Syntax

variable = (condition) ? expressionTrue : expressionFalse;

Instead of writing:

Example

int time = 20;
if (time < 18) {
  cout << "Good day.";
} else {
  cout << "Good evening.";
}
Run example »

You can simply write:

Example

int time = 20;
string result = (time < 18) ? "Good day." : "Good evening.";
cout << result;
Run example »

C++ Switch


C++ Switch Statements

Use the switch statement to select one of many code blocks to be executed.

Syntax

switch(expression) {
  case x:
    // code block
    break;
  case y:
    // code block
    break;
  default:
    // code block
}

This is how it works:

The example below uses the weekday number to calculate the weekday name:

Example

int day = 4;
switch (day) {
  case 1:
    cout << "Monday";
    break;
  case 2:
    cout << "Tuesday";
    break;
  case 3:
    cout << "Wednesday";
    break;
  case 4:
    cout << "Thursday";
    break;
  case 5:
    cout << "Friday";
    break;
  case 6:
    cout << "Saturday";
    break;
  case 7:
    cout << "Sunday";
    break;
}
// Outputs "Thursday" (day 4)
Run example »

The break Keyword

When C++ reaches a break keyword, it breaks out of the switch block.

This will stop the execution of more code and case testing inside the block.

When a match is found, and the job is done, it's time for a break. There is no need for more testing.

A break can save a lot of execution time because it "ignores" the execution of all the rest of the code in the switch block.


The default Keyword

The default keyword specifies some code to run if there is no case match:

Example

int day = 4;
switch (day) {
  case 6:
    cout << "Today is Saturday";
    break;
  case 7:
    cout << "Today is Sunday";
    break;
  default:
    cout << "Looking forward to the Weekend";
}
// Outputs "Looking forward to the Weekend"
Run example »

Note: The default keyword must be used as the last statement in the switch, and it does not need a break.


C++ While Loop


C++ Loops

Loops can execute a block of code as long as a specified condition is reached.


C++ While Loop

The while loop loops through a block of code as long as a specified condition is true:

Syntax

while (condition) {
  // code block to be executed
}

In the example below, the code in the loop will run, over and over again, as long as a variable (i) is less than 5:

Example

int i = 0;
while (i < 5) {
  cout << i << "\n";
  i++;
}
Run example »

Note: Do not forget to increase the variable used in the condition, otherwise the loop will never end!


The Do/While Loop

The do/while loop is a variant of the while loop. This loop will execute the code block once, before checking if the condition is true, then it will repeat the loop as long as the condition is true.

Syntax

do {
  // code block to be executed
}
while (condition);

The example below uses a do/while loop. The loop will always be executed at least once, even if the condition is false, because the code block is executed before the condition is tested:

Example

int i = 0;
do {
  cout << i << "\n";
  i++;
}
while (i < 5);
Run example »

Do not forget to increase the variable used in the condition, otherwise the loop will never end!


C++ For Loop


C++ For Loop

When you know exactly how many times you want to loop through a block of code, use the for loop instead of a while loop:

Syntax

for (statement 1; statement 2; statement 3) {
  // code block to be executed
}

Statement 1 is executed (one time) before the execution of the code block.

Statement 2 defines the condition for executing the code block.

Statement 3 is executed (every time) after the code block has been executed.

The example below will print the numbers 0 to 4:

Example

for (int i = 0; i < 5; i++) {
  cout << i << "\n";
}
Run example »

Example explained

Statement 1 sets a variable before the loop starts (int i = 0).

Statement 2 defines the condition for the loop to run (i must be less than 5). If the condition is true, the loop will start over again, if it is false, the loop will end.

Statement 3 increases a value (i++) each time the code block in the loop has been executed.


Another Example

This example will only print even values between 0 and 10:

Example

for (int i = 0; i <= 10; i = i + 2) {
  cout << i << "\n";
}
Run example »

C++ Break and Continue


C++ Break

You have already seen the break statement used in an earlier chapter of this tutorial. It was used to "jump out" of a switch statement.

The break statement can also be used to jump out of a loop.

This example jumps out of the loop when i is equal to 4:

Example

for (int i = 0; i < 10; i++) {
  if (i == 4) {
    break;
  }
  cout << i << "\n";
}
Run example »

C++ Continue

The continue statement breaks one iteration (in the loop), if a specified condition occurs, and continues with the next iteration in the loop.

This example skips the value of 4:

Example

for (int i = 0; i < 10; i++) {
  if (i == 4) {
    continue;
  }
  cout << i << "\n";
}
Run example »


Break and Continue in While Loop

You can also use break and continue in while loops:

Break Example

int i = 0;
while (i < 10) {
  cout << i << "\n";
  i++;
  if (i == 4) {
    break;
  }
}
Run example »

Continue Example

int i = 0;
while (i < 10) {
  if (i == 4) {
    i++;
    continue;
  }
  cout << i << "\n";
  i++;
}
Run example »

C++ Arrays


C++ Arrays

Arrays are used to store multiple values in a single variable, instead of declaring separate variables for each value.

To declare an array, define the variable type, specify the name of the array followed by square brackets and specify the number of elements it should store:

string cars[4];

We have now declared a variable that holds an array of four strings. To insert values to it, we can use an array literal - place the values in a comma-separated list, inside curly braces:

string cars[4] = {"Volvo", "BMW", "Ford", "Mazda"};

To create an array of three integers, you could write:

int myNum[3] = {10, 20, 30};

Access the Elements of an Array

You access an array element by referring to the index number.

This statement accesses the value of the first element in cars:

Example

string cars[4] = {"Volvo", "BMW", "Ford", "Mazda"};
cout << cars[0];
// Outputs Volvo
Run example »

Note: Array indexes start with 0: [0] is the first element. [1] is the second element, etc.


Change an Array Element

To change the value of a specific element, refer to the index number:

Example

cars[0] = "Opel";

Example

string cars[4] = {"Volvo", "BMW", "Ford", "Mazda"};
cars[0] = "Opel";
cout << cars[0];
// Now outputs Opel instead of Volvo
Run example »

Loop Through an Array

You can loop through the array elements with the for loop.

The following example outputs all elements in the cars array:

Example

string cars[4] = {"Volvo", "BMW", "Ford", "Mazda"};
for(int i = 0; i < 4; i++) {
  cout << cars[i] << "\n";
}
Run example »

Omit Array Size

You don't have to specify the size of the array. But if you don't, it will only be as big as the elements that are inserted into it:

string cars[] = {"Volvo", "BMW", "Ford"}; // size of array is always 3

This is completely fine. However, the problem arise if you want extra space for future elements. Then you have to overwrite the existing values:

string cars[] = {"Volvo", "BMW", "Ford"};
string cars[] = {"Volvo", "BMW", "Ford", "Mazda", "Tesla"};

If you specify the size however, the array will reserve the extra space:

string cars[5] = {"Volvo", "BMW", "Ford"}; // size of array is 5, even though it's only three elements inside it

Now you can add a fourth and fifth element without overwriting the others:

string cars[3] = {"Mazda"};
string cars[4] = {"Tesla"};
Run example »

Omit Elements on Declaration

It is also possible to declare an array without specifying the elements on declaration, and add them later:

string cars[5];
string cars[0] = {"Volvo"};
string cars[1] = {"BMW"};
...
Run example »


C++ References


Creating References

A reference variable is a "reference" to an existing variable, and it is created with the & operator:

string food = "Pizza";  // food variable
string &meal = food;    // reference to food

Now, we can use either the variable name food or the reference name meal to refer to the food variable:

Example

string food = "Pizza";
string &meal = food;

cout << food << "\n";  // Outputs Pizza
cout << meal << "\n";  // Outputs Pizza
Run example »

Memory Address

In the example above, the & operator was used to create a reference variable. But it can also be used to get the memory address of a variable, which is the location of where the variable is stored on the computer.

When a variable is created in C++, a memory address is assigned to the variable. And when we assign a value to the variable, it is stored in this memory address.

To access it, use the & operator, and the result will represent where the variable is stored:

Example

string food = "Pizza";

cout << &food; // Outputs 0x6dfed4
Run example »

Note: The memory address is in hexidecimal form (0x..). Note that you may not get the same result in your program.

And why is it useful to know the memory address?

References and Pointers (which you will learn about in the next chapter) are important in C++, because they give you the ability to manipulate the data in the computer's memory - which can reduce the code and improve the perfomance.

These two features are one of the things that make C++ stand out from other programming langues, like Python and Java.


C++ Pointers


Creating Pointers

You learned from the previous chapter, that we can get the memory address of a variable by using the & operator:

Example

string food = "Pizza"; // A food variable of type string

cout << food;  // Outputs the value of food (Pizza)
cout << &food; // Outputs the memory address of food (0x6dfed4)
Run example »

A pointer however, is a variable that stores the memory address as its value.

A pointer variable points to a data type (like int or string) of the same type, and is created with the * operator. The address of the variable you're working with is assigned to the pointer:

Example

string food = "Pizza";  // A food variable of type string
string* ptr = &food;    // A pointer variable, with the name ptr, that stores the address of food

// Output the value of food (Pizza)
cout << food << "\n";

// Output the memory address of food (0x6dfed4)
cout << &food << "\n";

// Output the memory address of food with the pointer (0x6dfed4)
cout << ptr << "\n";
Run example »

Example explained

Create a pointer variable with the name ptr, that points to a string variable, by using the asterisk sign * (string* ptr). Note that the type of the pointer has to match the type of the variable you're working with.

Use the & operator to store the memory address of the variable called food, and assign it to the pointer.

Now, ptr holds the value of food's memory address.

Tip: There are three ways to declare pointer variables, but the first way is preferred:

string* mystring; // Preferred
string *mystring;
string * mystring;

Get Memory Address and Value

In the example above, we used the pointer variable to get the memory address of a variable (used together with the & reference operator). However, you can also use the pointer to get the value of the variable, by using the * operator (the dereference operator):

Example

string food = "Pizza";  // Variable declaration
string* ptr = &food;    // Pointer declaration

// Reference: Output the memory address of food with the pointer (0x6dfed4)
cout << ptr << "\n";

// Dereference: Output the value of food with the pointer (Pizza)
cout << *ptr << "\n";
Run example »

Note that the * sign can be confusing here, as it does two different things in our code:


Modify the Pointer Value

You can also change the pointer's value. But note that this will also change the value of the original variable:

Example

string food = "Pizza";
string* ptr = &food;

// Output the value of food (Pizza)
cout << food << "\n";

// Output the memory address of food (0x6dfed4)
cout << &food << "\n";

// Access the memory address of food and output its value (Pizza)
cout << *ptr << "\n";

// Change the value of the pointer
*ptr = "Hamburger";

// Output the new value of the pointer (Hamburger)
cout << *ptr << "\n";

// Output the new value of the food variable (Hamburger)
cout << food << "\n";
Run example »


C++ Functions


A function is a block of code which only runs when it is called.

You can pass data, known as parameters, into a function.

Functions are used to perform certain actions, and they are important for reusing code: Define the code once, and use it many times.


Create a Function

C++ provides some pre-defined functions, such as main(), which is used to execute code. But you can also create your own functions to perform certain actions.

To create (often referred to as declare) a function, specify the name of the function, followed by parentheses ():

Syntax

void myFunction() {
  // code to be executed
}

Example Explained


Call a Function

Declared functions are not executed immediately. They are "saved for later use", and will be executed later, when they are called.

To call a function, write the function's name followed by two parentheses () and a semicolon ;

In the following example, myFunction() is used to print a text (the action), when it is called:

Example

Inside main, call myFunction():

// Create a function
void myFunction() {
  cout << "I just got executed!";
}

int main() {
  myFunction(); // call the function
  return 0;
}

// Outputs "I just got executed!"
Run example »

A function can be called multiple times:

Example

void myFunction() {
  cout << "I just got executed!\n";
}

int main() {
  myFunction();
  myFunction();
  myFunction();
  return 0;
}

// I just got executed!
Run example »

Function Declaration and Definition

A C++ function consist of two parts:

void myFunction() { // declaration
  // the body of the function (definition)
}

Note: If a user-defined function, such as myFunction() is declared after the main() function, an error will occur. It is because C++ works from top to bottom; which means that if the function is not declared above main(), the program is unaware of it:

Example

int main() {
  myFunction();
  return 0;
}

void myFunction() {
  cout << "I just got executed!";
}

// Error
Run example »

However, it is possible to separate the declaration and the definition of the function - for code optimization.

You will often see C++ programs that have function declaration above main(), and function definition below main(). This will make the code better organized and easier to read:

Example

// Function declaration
void myFunction();

// The main method
int main() {
  myFunction();  // call the function
  return 0;
}

// Function definition
void myFunction() {
  cout << "I just got executed!";
}
Run example »

C++ Functions Parameters


Parameters and Arguments

Information can be passed to functions as a parameter. Parameters act as variables inside the function.

Parameters are specified after the function name, inside the parentheses. You can add as many parameters as you want, just separate them with a comma:

Syntax

void functionName(parameter1, parameter2, parameter3) {
  // code to be executed
}

The following example has a function that takes a string called fname as parameter. When the function is called, we pass along a first name, which is used inside the function to print the full name:

Example

void myFunction(string fname) {
  cout << fname << " Refsnes\n";
}

int main() {
  myFunction("Liam");
  myFunction("Jenny");
  myFunction("Anja");
  return 0;
}

// Liam Refsnes
// Jenny Refsnes
// Anja Refsnes
Run example »

When a parameter is passed to the function, it is called an argument. So, from the example above: string fname is a parameter, while Liam, Jenny and Anja are arguments.


Multiple Parameters

You can add as many parameters as you want:

Example

void myFunction(string fname, int age) {
  cout << fname << " Refsnes. " << age << " years old. \n";
}

int main() {
  myFunction("Liam", 3);
  myFunction("Jenny", 14);
  myFunction("Anja", 30);
  return 0;
}

// Liam Refsnes. 3 years old.
// Jenny Refsnes. 14 years old.
// Anja Refsnes. 30 years old.
Run example »

Note that when you are working with multiple parameters, the function call must have the same number of arguments as there are parameters, and the arguments must be passed in the same order.


Return Values

The void keyword, used in the examples above, indicates that the function should not return a value. If you want the function to return a value, you can use a data type (such as int, string, etc.) instead of void, and use the return keyword inside the function:

Example

int myFunction(int x) {
  return 5 + x;
}

int main() {
  cout << myFunction(3);
  return 0;
}

// Outputs 8 (5 + 3)
Run example »

This example returns the sum of a function with two parameters:

Example

int myFunction(int x, int y) {
  return x + y;
}

int main() {
  cout << myFunction(5, 3);
  return 0;
}

// Outputs 8 (5 + 3)
Run example »

You can also store the result in a variable:

Example

int myFunction(int x, int y) {
  return x + y;
}

int main() {
  int z = myFunction(5, 3);
  cout << z;
  return 0;
}
// Outputs 8 (5 + 3)
Run example »


C++ Function Overloading


Function Overloading

With function overloading multiple functions can have the same name with different parameters:

Example

int myFunction(int x)
float myFunction(float x)
double myFunction(double x, double y)

Consider the following example, which have two functions that adds numbers of different types:

Example

int plusFuncInt(int x, int y) {
  return x + y;
}

double plusFuncDouble(double x, double y) {
  return x + y;
}

int main() {
  int myNum1 = plusFuncInt(8, 5);
  double myNum2 = plusFuncDouble(4.3, 6.26);
  cout << "Int: " << myNum1 << "\n";
  cout << "Double: " << myNum2;
  return 0;
}
Run example »

Instead of defining two functions that should do the same thing, it is better to overload one.

In the example below, we overload the plusFunc function to work for both integers and doubles:

Example

int plusFunc(int x, int y) {
  return x + y;
}

double plusFunc(double x, double y) {
  return x + y;
}

int main() {
  int myNum1 = plusFunc(83, 5);
  double myNum2 = plusFunc(6.3, 5.2);
  cout << "Int: " << myNum1 << "\n";
  cout << "Double: " << myNum2;
  return 0;
}
Run example »

Note: Multiple functions can have the same name as long as the number and/or type of parameters are different.


C++ Classes and Objects


C++ Classes/Objects

C++ is an object-oriented programming language.

Everything in C++ is associated with classes and objects, along with its attributes and methods. For example: in real life, a car is an object. The car has attributes, such as weight and color, and methods, such as drive and brake.

Attributes and methods are basically variables and functions that belongs to the class. These are often referred to as "class members".

A class is a user-defined data type that we can use in our program, and it works as an object constructor, or a "blueprint" for creating objects.


Create a Class

To create a class, use the class keyword:

Example

Create a class called "MyClass":

class MyClass {       // The class
  public:             // Access specifier
    int myNum;        // Attribute (int variable)
    string myString;  // Attribute (string variable)
};

Example explained


Create an Object

In C++, an object is created from a class. We have already created the class named MyClass, so now we can use this to create objects.

To create an object of MyClass, specify the class name, followed by the object name.

To access the class attributes (myNum and myString), use the dot syntax (.) on the object:

Example

Create an object called "myObj" and access the attributes:

class MyClass {       // The class
  public:             // Access specifier
    int myNum;        // Attribute (int variable)
    string myString;  // Attribute (string variable)
};

int main() {
  MyClass myObj;  // Create an object of MyClass

  // Access attributes and set values
  myObj.myNum = 15; 
  myObj.myString = "Some text";

  // Print attribute values
  cout << myObj.myNum << "\n";
  cout << myObj.myString;
  return 0;
}
Run example »

Multiple Objects

You can create multiple objects of one class:

Example

// Create a Car class with some attributes
class Car {
  public:
    string brand;   
    string model;
    int year;
};

int main() {
  // Create an object of Car
  Car carObj1;
  carObj1.brand = "BMW";
  carObj1.model = "X5";
  carObj1.year = 1999;

  // Create another object of Car
  Car carObj2;
  carObj2.brand = "Ford";
  carObj2.model = "Mustang";
  carObj2.year = 1969;

  // Print attribute values
  cout << carObj1.brand << " " << carObj1.model << " " << carObj1.year << "\n";
  cout << carObj2.brand << " " << carObj2.model << " " << carObj2.year << "\n";
  return 0;
}
Run example »

C++ Class Methods


Class Methods

Methods are functions that belongs to the class.

There are two ways to define functions that belongs to a class:

In the following example, we define a function inside the class, and we name it "myMethod".

Note: You access methods just like you access attributes; by creating an object of the class and by using the dot syntax (.):

Inside Example

class MyClass {        // The class
  public:              // Access specifier
    void myMethod() {  // Method/function defined inside the class
      cout << "Hello World!";
    }
};

int main() {
  MyClass myObj;     // Create an object of MyClass
  myObj.myMethod();  // Call the method
  return 0;
}
Run example »

To define a function outside the class definition, you have to declare it inside the class and then define it outside of the class. This is done by specifiying the name of the class, followed the scope resolution :: operator, followed by the name of the function:

Outside Example

class MyClass {        // The class
  public:              // Access specifier
    void myMethod();   // Method/function declaration
};

// Method/function definition outside the class
void MyClass::myMethod() {
  cout << "Hello World!";
}

int main() {
  MyClass myObj;     // Create an object of MyClass
  myObj.myMethod();  // Call the method
  return 0;
}
Run example »

Parameters

You can also add parameters:

 Example

#include <iostream>
using namespace std;

class Car {
  public:
    int speed(int maxSpeed);
};

int Car::speed(int maxSpeed) {
  return maxSpeed;
}

int main() {
  Car myObj; // Create an object of Car
  cout << myObj.speed(200); // Call the method with an argument
  return 0;
}
Run example »

C++ Constructors


Constructors

A constructor in C++ is a special method that is automatically called when an object of a class is created.

To create a constructor, use the same name as the class, followed by parentheses ():

Example

class MyClass {     // The class
  public:           // Access specifier
    MyClass() {     // Constructor
      cout << "Hello World!";
    }
};

int main() {
  MyClass myObj;    // Create an object of MyClass (this will call the constructor)
  return 0;
}
Run example »

Note: The constructor has the same name as the class, it is always public, and it does not have any return value.


Constructor Parameters

Constructors can also take parameters (just like regular functions), which can be useful for setting initial values for attributes.

The following class have brand, model and year attributes, and a constructor with different parameters. Inside the constructor we set the attributes equal to the constructor parameters (brand=x, etc). When we call the constructor (by creating an object of the class), we pass parameters to the constructor, which will set the value of the corresponding attributes to the same:

Example

class Car {        // The class
  public:          // Access specifier
    string brand;  // Attribute
    string model;  // Attribute
    int year;      // Attribute
    Car(string x, string y, int z) { // Constructor with parameters
      brand = x;
      model = y;
      year = z;
    }
};

int main() {
  // Create Car objects and call the constructor with different values
  Car carObj1("BMW", "X5", 1999);
  Car carObj2("Ford", "Mustang", 1969);

  // Print values
  cout << carObj1.brand << " " << carObj1.model << " " << carObj1.year << "\n";
  cout << carObj2.brand << " " << carObj2.model << " " << carObj2.year << "\n";
  return 0;
}
Run example »

Just like functions, constructors can also be defined outside the class. First, declare the constructor inside the class, and then define it outside of the class by specifying the name of the class, followed by the scope resolution :: operator, followed by the name of the constructor (which is the same as the class):

Example

class Car {        // The class
  public:          // Access specifier
    string brand;  // Attribute
    string model;  // Attribute
    int year;      // Attribute
    Car(string x, string y, int z); // Constructor declaration
};

// Constructor definition outside the class
Car::Car(string x, string y, int z) {
  brand = x;
  model = y;
  year = z;
}

int main() {
  // Create Car objects and call the constructor with different values
  Car carObj1("BMW", "X5", 1999);
  Car carObj2("Ford", "Mustang", 1969);

  // Print values
  cout << carObj1.brand << " " << carObj1.model << " " << carObj1.year << "\n";
  cout << carObj2.brand << " " << carObj2.model << " " << carObj2.year << "\n";
  return 0;
}
Run example »

C++ Access Specifiers


Access Specifiers

By now, you are quite familiar with the public keyword that appears in all of our class examples:

Example

class MyClass {  // The class
  public:        // Access specifier
    // class members goes here
};
Run example »

The public keyword is an access specifier. Access specifiers define how the members (attributes and methods) of a class can be accessed. In the example above, the members are public - which means that they can be accessed and modified from outside the code.

However, what if we want members to be private and hidden from the outside world?

In C++, there are three access specifiers:

In the following example, we demonstrate the differences between public and private members:

Example

class MyClass {
  public:    // Public access specifier
    int x;   // Public attribute
  private:   // Private access specifier
    int y;   // Private attribute
};

int main() {
  MyClass myObj;
  myObj.x = 25;  // Allowed (public)
  myObj.y = 50;  // Not allowed (private)
  return 0;
}

If you try to access a private member, an error occurs:

error: y is private
Run example »

Note: It is possible to access private members of a class using a public method inside the same class. See the next chapter (Encapsulation) on how to do this.

Tip: It is considered good practice to declare your class attributes as private (as often as you can). This will reduce the possibility of yourself (or others) to mess up the code. This is also the main ingredient of the Encapsulation concept, which you will learn more about in the next chapter.

Note: By default, all members of a class is private if you don't specify an access specifier:

Example

class MyClass {
  int x;   // Private attribute
  int y;   // Private attribute
};

C++ Encapsulation


Encapsulation

The meaning of Encapsulation, is to make sure that "sensitive" data is hidden from users. To achieve this, you must declare class variables/attributes as private (cannot be accessed from outside the class). If you want others to read or modify the value of a private member, you can provide public getter and setter methods.


Access Private Members

To access a private attribute, use public "getter" and "setter" methods:

Example

#include <iostream>
using namespace std;

class Employee {
  private:
    // Private attribute
    int salary;

  public:
    // Setter
    void setSalary(int s) {
      salary = s;
    }
    // Getter
    int getSalary() {
      return salary;
    }
};

int main() {
  Employee myObj;
  myObj.setSalary(50000);
  cout << myObj.getSalary();
  return 0;
}
Run example »

Example explained

The salary attribute is private, which have restricted access.

The public setSalary() method takes a parameter (s) and assigns it to the salary attribute (salary = s).

The public getSalary() method returns the value of the private salary attribute.

Inside main(), we create an object of the Employee class. Now we can use the setSalary() method to set the value of the private attribute to 50000. Then we call the getSalary() method on the object to return the value.


Why Encapsulation?


C++ Inheritance


C++ Inheritance

In C++, it is possible to inherit attributes and methods from one class to another. We group the "inheritance concept" into two categories:

In the example below, the Car class (child) inherits the attributes and methods from the Vehicle class (parent):

Example

// Base class
class Vehicle {
  public:
    string brand = "Ford";
    void honk() {
      cout << "Tuut, tuut! \n" ;
    }
};

// Derived class
class Car: public Vehicle {
  public:
    string model = "Mustang";
};

int main() {
  Car myCar;
  myCar.honk();
  cout << myCar.brand + " " + myCar.model;
  return 0;
}
Run example »

Why And When To Use "Inheritance"?

- It is useful for code reusability: reuse attributes and methods of an existing class when you create a new class.


Multilevel Inheritance

A class can also be derived from one class, which is already derived from another class.

In the following example, MyGrandChild is derived from class MyChild (which is derived from MyClass).

Example

// Base class (parent)
class MyClass {
  public:
    void myFunction() {
      cout << "Some content in parent class." ;
    }
};

// Derived class (child)
class MyChild: public MyClass {
};

// Derived class (grandchild)
class MyGrandChild: public MyChild {
};

int main() {
  MyGrandChild myObj;
  myObj.myFunction();
  return 0;
}
Run example »

Multiple Inheritance

A class can also be derived from more than one base class, using a comma-separated list:

Example

// Base class
class MyClass {
  public:
    void myFunction() {
      cout << "Some content in parent class." ;
    }
};

// Another base class
class MyOtherClass {
  public:
    void myOtherFunction() {
      cout << "Some content in another class." ;
    }
};

// Derived class
class MyChildClass: public MyClass, public MyOtherClass {
};

int main() {
  MyChildClass myObj;
  myObj.myFunction();
  myObj.myOtherFunction();
  return 0;
}
Run example »

Access Specifiers

You learned from the Access Specifiers chapter that there are three specifiers available in C++. Until now, we have only used public (members of a class are accessible from outside the class) and private (members can only be accessed within the class). The third specifier, protected, is similar to private, but it can also be accessed in the inherited class:

Example

// Base class
class Employee {
  protected: // Protected access specifier
    int salary;
};

// Derived class
class Programmer: public Employee {
  public:
    int bonus;
    void setSalary(int s) {
      salary = s;
    }
    int getSalary() {
      return salary;
    }
};

int main() {
  Programmer myObj;
  myObj.setSalary(50000);
  myObj.bonus = 15000;
  cout << "Salary: " << myObj.getSalary() << "\n";
  cout << "Bonus: " << myObj.bonus << "\n";
  return 0;
}
Run example »

C++ Examples


C++ Syntax

Create a simple "Hello World" program
Syntax Explained

C++ Output/Print

Use cout to output values/print text Using many cout objects Insert a new line with \n Insert a new line with endl
Output Explained

C++ Comments

Single-line comment before a line of code Single-line comment at the end of a line of code Multi-line comment
Comments Explained

C++ Variables

Create an integer variable Create a variable without assigning the value, and assign the value later Assign a new value to an existing value (this will overwrite the previous value) Create an unchangeable variable with the const keyword Combine text and a variable on print Add a variable to another variable Declare many variables of the same type with a comma-separated list
Variables Explained

C++ User Input

Input a number and print the result Input two numbers and print the sum
User Input Explained

C++ Data Types

A demonstration of different data types Create an int type Create a float type Create a double type Create boolean types Create a char type Create a string type
Data Types Explained

C++ Operators

Addition operator Increment operator Assignment operator Addition assignment operator
Operators Explained

C++ Strings

Create a string String concatenation String length Access string characters Change string characters User input strings
Strings Explained

C++ Math

Find the highest value of two numbers Find the lowest value of two numbers Use the cmath header file for other math functions
Math Explained

C++ Booleans

Boolean values Compare two values Compare two variables
Booleans Explained

C++ If...Else (Conditions)

The if statement The else statement The else if statement
If...Else Explained

C++ Switch

The switch statement The switch statement with a default keyword
Switch Explained

C++ Loops

While loop Do while loop For loop Break a loop Continue a loop
Loops Explained

C++ Arrays

Create and access an array Change an array element Loop through an array
Arrays Explained

C++ References

Create a reference variable Access the memory address of a variable
References Explained

C++ Pointers

Create a pointer variable Get the value of a variable with the dereference operator * Modify the pointer value
Pointers Explained

C++ Functions

Create and call a function Call a function multiple times Function declaration and definition Parameters and arguments Multiple parameters Return value Return the sum of two parameters Function overloading
Functions Explained

C++ Classes/Objects

Create an object of a class and access class attributes Create multiple objects Create class methods Define a class method outside the class definition Add parameters to a class method Create a constructor Constructor parameters Constructor defined outside the class Public and private specifiers Encapsulation - hide sensitive data from users Inheritance - inherit attributes and methods from one class to another Multilevel inheritance Multiple inheritance
Classes/Objects Explained

C++ Exercises


You can test your C++ skills with W3Schools' Exercises.


Exercises

We have gathered a variety of C++ exercises (with answers) for each C++ Chapter.

Try to solve an exercise by editing some code, or show the answer to see what you've done wrong.

Count Your Score

You will get 1 point for each correct answer. Your score and total score will always be displayed.

Start C++ Exercises

Good luck!

Start C++ Exercises ❯

If you don't know C++, we suggest that you read our C++ Tutorial from scratch.